A New Era: My Sig Sauer P320 X5 Legion

S&W M&P9 Full Size

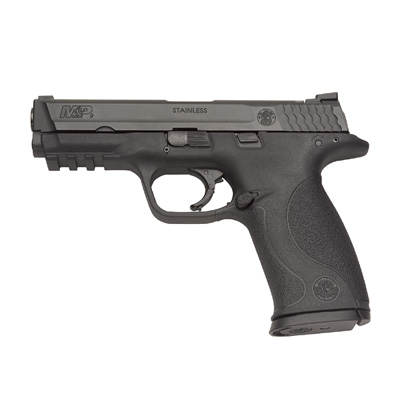
After almost 9 years with the M&P9 platform it was finally time to move on. I own three M&P9 Full Size guns, one Compact, and a Shield. All have Apex Action Enhancement Kits. All have either Trijicon HD night sights or red dots. All served me very well for a very long time.

Then I failed equipment check at a major match this year when my striker block safety failed due to excessive wear. I quickly spent a fair amount of time and money making all these guns of various ages and round counts work flawlessly. New striker assemblies, new spring kits, new barrels, etc. Everything was back to normal. I could breathe again.

Sig Sauer P320 X Five Legion

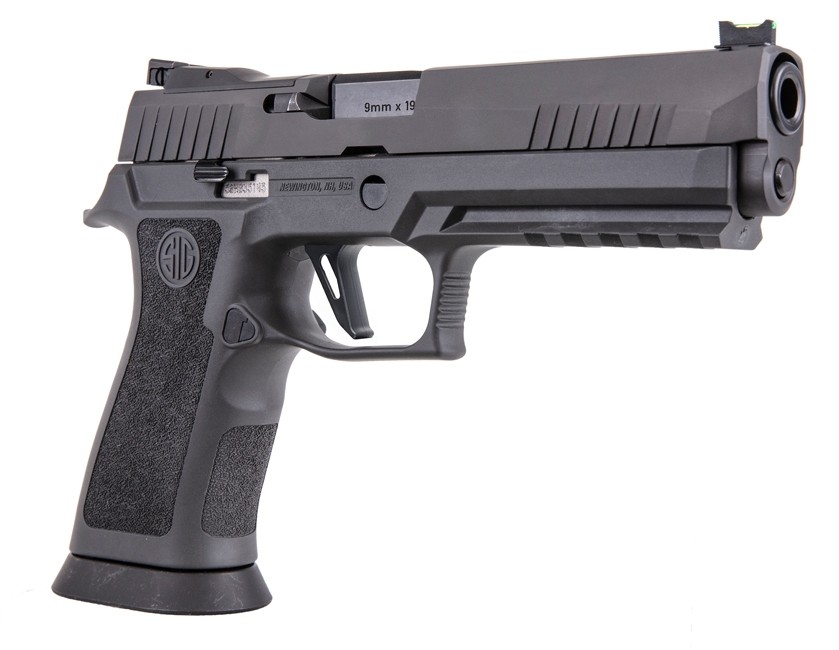
Then one day on my way to a match, MikeM says “You know, there’s an ‘event’ at the Sig Pro Shop today”. Oh brother! I had long appreciated the Sig P320 X5 that PaulS has been shooting for a couple of seasons. I even declared “If I was starting out today, that’s the gun I would shoot”. Then this summer Sig released the X5 Legion: a heavy-weight version of the X5 with an already excellent trigger. With that in mind It was all I could do to wait through the match!

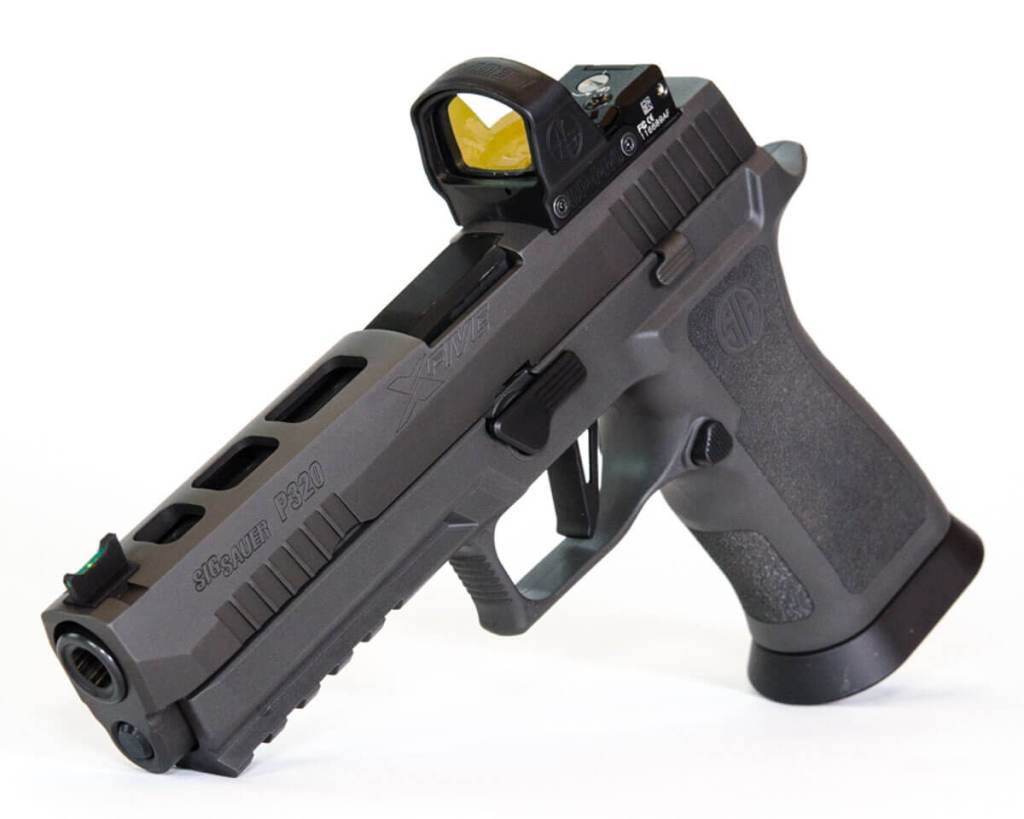
We arrived at the Pro Shop to find that all the X5 Legions they had in stock were gone except the one I had reserved. I convinced the sales guy to swap out the 17-round mag tubes for 10-round versions (for matches in Massachusetts) then bought another four 21-round mags for USPSA use. My buddy Paul agreed to loan me a Leupold Deltapoint Pro until the Romeo1 Pro was released and away we went.

My first impressions shooting this gun were very favorable. The ergonomics are magnificent. It actually feels very similar to an STI Edge. The weight and balance are wonderful. The very heavy barrel, tungsten-infused grip module, and massively lightened slide make for a very stable pistol while firing. The trigger is very good but I still got a Gray Guns competition kit for it which I installed immediately.

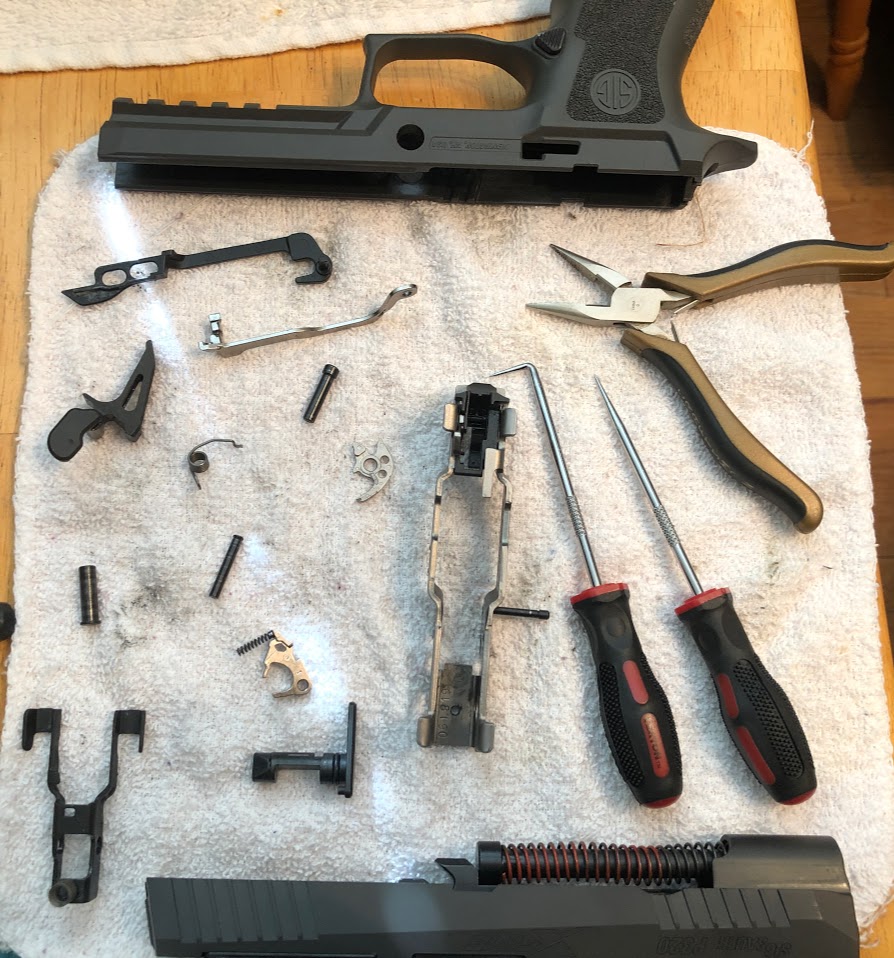
Even though the trigger weight was unchanged at 3.5 lbs. I liked the curved trigger and the reduced over-travel/reset of the GG system. The curved trigger shortens the length of pull slightly and I just prefer the feel. I also polished the FCU and trigger bar such that the pull weight is now down to 3 lbs. It’s not as light as the Apex CompAEK systems I put in all my M&P9s, not to mention the absolutely minimal over-travel and reset, but it’s still an excellent trigger. Perhaps someone will develop a similarly short and light system for this gun (are you listening Scott Folk???) but given all the other benefits I can live with it as-is.

A few days before the 2019 Life Free or Die New Hampshire IDPA championship I got my hands on a Romeo1 Pro sight and installed it on the gun. Going from a 2.5moa dot on the Deltapoint Pro to the 6moa of the R1Pro made an already easy-to-shoot platform even better. Gone are the days of my YouTube videos where I say “Where’s the <bleeping> dot???”

After learning the ins and outs of the P320 I must say I am thoroughly impressed. I wasn’t at all sure I would like the modular system but I really think it makes a lot of sense. My next purchase will be a P320 X-Compact to replace my M&P9c carry gun!

S&W M&P 9 – Part VII: Update

Well, it’s been a couple of months now with the M&P9. Let’s review where we are so far:

  • Apex Tactical “Competition Action Enhancement Kit”
  • Dawson sights (fiber 1.25 red front/ black serrated wide rear)
  • Black Diamond grip tape
  • stainless guide rod
  • ISMI 13lb spring
  • Polished the bearing surfaces on the trigger bar, striker block plunger and the sear.

That’s everything that’s been done to the pistol other than shoot it and clean it. As you may recall in Part VI, I didn’t have a great experience at my first match with this setup but this past weekend saw much improvement.

Since the September match I have put about 2.5k rounds through the gun. As you can see in the videos of the match the true character of this pistol is being revealed. I came in 2nd in production, winning the longest stage of the match outright. Additionally GMPS calculates combined scores across all divisions, which isn’t valid as far as USPSA is concerned but it’s a nice set of data to compare overall placement. Even with minor PF and 10-round mags, I was 6th overall. This is the best I’ve shot at a GMPS match by a good margin. The biggest change was in my accuracy. If you watch the Part IV video my run was under 40 seconds, due in large part to the fact that I cleared the Texas Star in six shots (one miss). Granted it wasn’t far away but it did have two no-shoot poppers sitting at the 5 and 7 o’clock positions, which made it pretty difficult. Also my A-hit ratio for the match was my highest ever.

During the course of the match I had one failure to feed after a mag change but I couldn’t tell what happened and you can’t see in the video. That was almost certainly not the fault of the pistol so I have to give it a perfect score on that account.

So this is much more the kind of result I expected from this platform. I think it will only get better. Hats off to the fine folks at Smith & Wesson for producing this outstanding pistol. Thanks also to Dawson Precision for those great sights and of course, thanks to Apex Tactical for the action kit which makes this easily the best competition pistol I’ve ever shot by a wide margin.

Maku Mozo!

S&W M&P 9 – Part VI: bottom line (sort-of)

After all the time, money and work spent on this project I was very anxious to get to the range with this tricked out pistol. This past weekend the Upper Valley Practical Shooters (UVPS) met per usual on Saturday morning to set up a practice stage and run through it several times. I asked if I could shoot the gun into the berm just as a function check and everyone was OK with that. I loaded one round and fired it without any trouble. I then put a 10-rounder in and blasted about a half-dozen rounds faster than I’ve ever done before. This was going to be fun.

I went first through the stage, which was a bunch of poppers and 1-shot paper targets, then transition to Box B and repeat. Plenty of hard cover on the paper too. We went through the stage five times each and I did OK, but nothing unusual. Once the usual suspects left Neil and I stayed to shoot some paper targets with the usual 2-shots-per-target routine. It was then that I noticed something disturbing: most of my shots were quite low but usually in line vertically with the target center. I then tried some aimed slow fire to confirm zero and was relieved to see that my groups were spot-on. So, what was happening? I can’t say with certainty but I suspect it is just that the cumulative changes will take time to get used to. I then went on to spend a good deal of time trying to gauge the reset. This was harder than it sounds, especially in the heat of running a stage. This will take some time too.

I went home puzzled but truthfully, between the action job and the sights this was a completely different gun. Not to mention that I only had the gun a week in total by this time. That’s a lot of change to assimilate. So, what to do next? Shoot a match!

Green Mountain Practical Shooters (GMPS) is another group to which I belong. We hold monthly matches in Morrisville, Vermont and yesterday was the scheduled monthly match. Bill and I headed up early in the morning.

I would love to tell you that I had the best match of my life but that isn’t what happened. I shot worse than usual, with a fair number A hits followed by C or D hits low. This is similar to what I noticed Saturday. I just don’t have the muscle memory in place yet for this radically different trigger. Now, there were other factors that should be mentioned. This match was the first multi-gun optional match ever held at GMPS which meant that I was shooting pistol on stages meant for rifles in many cases. Had these stages been more traditional I would certainly have done better, but even on the more normal sections I had trouble.

The other big thing to mention is that for some reason I decided to wear contact lenses instead of my usual glasses. This was just foolish. My extreme Myopia renders soft contact lenses only moderately effective at close ranges, like say the distance to the front sight of my pistol. My sight picture for the day consisted of a fuzzy red blob that sometimes appeared out of the darkness of my rear sight. Yep, not my best MENSA moment.

The last thing I’ll mention is that the match was delayed an hour starting and was only about 2/3 complete when we had to leave at almost 4 pm. Sure, it shouldn’t matter but the frustration of sitting around waiting all that time was certainly a factor.

Am I being a cry-baby? Probably, but this is shared in the interest of full disclosure. The bottom line is that this was far from an ideal match at which to try out a radically different gun from what I was used to shooting. I already knew from practice that I would need a ton of trigger time to dial in this new system but on the other hand I wasn’t going to miss the fun of a match just because I had a new platform.

So, where does that leave us? Well, there’s little doubt in my mind that with several thousand more rounds down range I will acclimate to this system and I will be better for it. The platform is everything I could ask for so now the rest is up to me. I will post a follow-up in Part VII after a few weeks so stay tuned.

Wish me luck!

Springfield Armory 1911 TRP: Yes, it’s that good.

My father carried a 1911 during WWII when serving as a Military Policeman. He always spoke very fondly of the weapon. Indeed the 1911 is a 20th century American icon. It comes then as no surprise that the pistol is still very popular among shooters even though it only carries seven or eight rounds (gasp!) in the typical magazine. Compact versions have even fewer rounds.

I have shot many 1911s and most were not very exciting to me frankly. Then my friend Jeff had me try out his Springfield that had been massaged at the custom shop. It was a revelation. The gun’s trigger was unreal with its very short take-up, light break and short reset. My Springfield XD45 Tactical was fun but this was other-worldy.

About a year later my friend Mike asked if I was interested in a 1911. He had two made by Springfield, which got my attention. The model was the Tactical Response Pistol (TRP) which I had never heard of at that time. This pistol is a civilian version of the pistol Springfield makes for the FBI’s SRT groups. It has a stainless, 5″ match barrel, teflon coated steel frame and slide, tuned 4# trigger, flared mag well, low profile combat night sights (tritium) and very aggressive checkering on the front strap. This gun is a combat gun in every sense of the word. The G10 composite grip panels are also agressively checkered such that there’s very little chance of this gun being wrenched out of one’s hand even if wet.

Mike sold me the black one and kept the stainless model. I have put about 2k rounds through it since this past Spring (six months) and I am very happy with it. The weight (over 2.5 lbs.) really mitigates recoil such that I figured it would be a fun gun to shoot in Limited/10 USPSA competition. I got the usual Bladetech DOH holster, Blackhawk CQC mag pouches, CR Speed Hi-Torque belt and a bunch of Chip McCormack PowerPro 10-round mags for it and away we went. I shoot it almost as well as my production guns and have really enjoyed myself doing so.

Interesting to note is that Mike recently stopped bringing his striker-fired guns to practice and has started shooting his TRP almost exclusively for USPSA purposes. His accuracy is now phenomenal. I’ll say it again: the trigger is nothing short of amazing.

I also got a Blackhawk Serpa holster for mine and I routinely carry this gun either open or concealed. It is one big, mean, tough pistol that can run under extreme conditions if necessary. I would not hesitate to recommend it to anyone interested in a very high-quality .45acp 1911.

S&W M&P 9: Part IV – A Comedy of Errors

I am exhausted. It’s after midnight and I’ve spent the last 10 hours working on this pistol on and off. Yes, this is a clear case of OCD but we knew that. The trouble started when I discovered the Apex Tactical trigger kit in the mailbox at lunch time.

The kit comes in a bubble wrap mailer and has many very small parts in it. I began watching the videos and working along with them. First I took out the sear block and removed the stock sear. Then I promptly dropped the block thereby ejecting the tiny sear spring and plunger into the Great Void known as the floor of my dining room. I immediately began searching the floor for the cap/plunger/button/thingy which is incredibly small. It is smaller than the diameter of a pencil lead. I grabbed a strong magnet, per Randy Lee’s suggestion in the video (gee, how did he know that might happen?) but still could not find it.

I gave up and called Smith and Wesson to order several sets but was told they don’t sell those tiny parts. Hmm. So where can I get them? He tells me that they can’t divulge their vendors because it’s a trade secret. OK, so what can I do? “Send the gun back to us and we will replace the sear block assembly”. OK, now I’m mad. Not only have I lost the tiny parts but now I have to pay for the whole block, 99% of which I don’t need. “Click”.

Back to the floor. I crawled over every square inch within a 10 ft. radius of the epicenter for another hour. No joy. I finally got a broom and swept every speck of dust, cleaning media, spent primers, dust bunnys and various small Lego parts into a nasty little pile and began my CSI routine. Two hours after dropping the sear block I found that damned plunger.

I took the time to polish the new sear’s bearing surface that mates to the trigger bar and also the top of the trigger bar that operates the striker plunger. Nice and shiny. I then reassembled the sear block and set it aside. You do actually need tweezers to put the new sear spring and plunger in place.

I then removed the trigger assembly. I replaced the trigger return spring and used the included aluminum slave pin to hold everything together while reinserting the trigger, trigger bar, return spring and ambi slide lock levers back in place. The task was much harder than Randy made it look in the videos. The biggest challenge was that when drifting in the trigger pin the return spring had a tendency to slip between the slave pin and the actual drift pin. The solution was to take all tension off the spring so that the drift pin could follow the slave pin out while keeping the return spring in place. There was one tiny problem: while holding the trigger and slide lock in place I needed to reinsert the locking block over them and the tiny retaining clip that ultimately holds the take-down lever decided to jump right out onto the floor. Sound familiar?

The worst part was, just like the sear spring, Randy warned me in the video. Rats! So, back to the floor. It was much cleaner this time but even with a high-intensity light and the rare earth magnet I found, I could not find it! Eventually I repeated the successful technique from earlier: I swept the entire area, gently, toward the same spot I had used earlier. Sure enough, after sifting through the (much smaller) dust pile, I found the retaining clip.

OK, with the trigger back in place I then reinstalled the sear block with the trigger bar bringing it all together. Hallelujah!

Moving on to the slide, I replaced the stock striker spring with the one from the kit. This took about 10 minutes. The only thing I had left was to replace the striker plunger and its spring. I took the set screw out of the rear sight and drifted the sight out to reveal the cap, spring and striker plunger. I replaced them with the kit parts and proceeded to reassemble. One catch: the striker plunger spring is much higher than the stock one and it wants to come out. You guessed it…

Back to the floor! At least by now the routine took only about 15 minutes. With the rear sight reinstalled I had completed the Action Enhancement Kit installation. It was about time.

I have not mentioned that I was testing the trigger each step of the way. This was fascinating because some of these parts actually made the trigger pull a bit harder. This is necessary if you want the trigger to actually reset when you release it and you want the striker to actually hit the primer hard enough to fire the round. The bottom line is that at the end of the day the trigger is amazing. There’s a long take-up that gets me 85% of the way to the travel stop. When the trigger is ready to break, there is a distinct wall. From there it is a very small effort to break the shot. The claimed 2.75 lbs. sounds right. There is almost no over-travel and the reset is very short. Is this like a single-action trigger? Not really but it is incredibly smooth, light and short. I suspect that once I acclimate to the reset I will be able get my split times much lower.

Next up in Part V: installing the Dawson sights!

S&W M&P 9mm: Part II

A critical component of any competition pistol is the trigger. No matter how nicely the gun fits your hand, no matter how well the sights work and no matter how expensive or cheap the gun is, without a good trigger the wheels will come off quickly. When pulling the trigger it is essential that as few muscles as possible be used to effect the necessary movement. Any additional involvement of other muscles will cause undesirable movement of the gun, resulting in poor shots. The challenge then is to make the trigger as light and smooth as possible while maintaining complete control of the pistol.

This brings up another topic: what is the “right” amount of trigger pull? Conventional wisdom says that for duty carry a gun should have a fairly heavy trigger pull. Some police departments in the US actually require armorers to set the trigger at over 11 lbs. Most folks would say that 6-7 lbs. is best for typical concealed carry applications. However, I’ve also seen it argued that as long as you follow the basic trigger safety rule (never put your finger on the trigger until yours sights are on the target and you intend to shoot) the trigger weight can be much lighter. This debate can go on ad infinitum and I really don’t want to weigh in personally. What I will say is that for competition applications, having a trigger that is much lighter than 6-7 lbs., is smooth and has a clean, predictable break is essential.

The M&P9 comes from the factory with a 6.5 lb. trigger pull. It is smooth and predictable but with a lot of take-up and a fair amount of over-travel. This means that once the shot breaks, the trigger continues rearward for some additional distance before hitting a stop. I will say that the nice wide trigger face makes it feel lighter than it actually is. That and the absence of the trigger safety “blade” makes this one of the nicest stock striker triggers I’ve seen. Nevertheless, I knew it could be much better.

After digging around, I discovered Burwell Gunsmithing. If you are looking for a gunsmith for your M&P you will be hard pressed to find folks with a better record than these guys. They also have made available this excellent guide to M&P Trigger Work. I applaud any vendor that takes this approach. Here they have provided a clear and complete guide to Armorer stripping and completely reworking the trigger in your M&P. For those with the skills, tools, time and patience, this is all you need to super-tune your trigger. For the rest of us it shows us just what we are paying for when using Burwell’s services. Kudos.

As you can imagine I realized fairly quickly that this was not a project I wanted to take on myself. It doesn’t take much to ruin a trigger part by changing an edge or profile in the wrong way. Lucky for me I also found Apex Tactical who have thrown themselves heavily into the S&W aftermarket. In late 2009 AT began shipping hardened sears for the M&P. This eventually grew to include Action Enhancement Kits (AEK) for both duty/carry and competition applications. These kits include the following:

  • Apex Hard Sear

    comp_aek_600-300x189
    Apex Tactical Competition “Action Enhancement Kit
  • Apex Ultimate Striker Block kit
  • Apex Competition striker spring
  • Apex Competition sear spring
  • Apex Competition trigger return spring
  • Apex Aluminum Slave pin for installing the Trigger Return Spring

I ordered my competition kit last night and have been watching the videos today. I expect this will take an hour of deliberate work to install. Experienced armorers can do it in 20-30 minutes. Given the rave reviews these kits have received I expect this to be a dramatic improvement in terms of over-travel, reset, smoothness and pull weight. In fact the finished trigger is guaranteed to be sub-3lbs. That’s getting into 1911 territory!

Next up in Part III: grip tape and new mags (while I wait for the Apex kit!)